Welcome

Welcome

Wednesday 12 June 2013

CHRISTMAS PEOPLE


Hello everyone..........long time since we have seen each other.  I am sorry about that...so much has been happening, so much to do and so little time to do it all in.  Let me see now, I hope that you have all been behaving and creating and making peace wherever you are.

First of all, I have been poorly, but am recovered now, which is a real blessing.  During this time I have also changed my craft room around.............


Well, that's not strictly true...I have given some crafty items away to good homes, where they will be loved and cherished and used.  So I am happy about that.


This is my new desk and chair.  I love them both equally and it has freed up my old desk for crafting on permanently ....................whoo Hoo!  That has made me a very happy bunny.

Okay then, the title of this blog is Christmas people, and this is the first post about these lovely guests who now live at my house....... but they will be looking for new homes nearer Christmas.

Here is the bits and pieces all laid out ready to start work with:


So, I have here 6 wooden bodies, wool, felt, paint, brushes, glue, cocktail sticks, small red wooden beads and a template for the hats.  Everything is provided in these kits from Panduro, and they are always of great quality with extra incase a mistake is made.


This template for the hat is so simple, you would need help to get it wrong!


So this is a red bead and then I split it in two.


I decided to paint 3 grey and 3 red and then painted random white stripes down them all.  It felt appropriate to also add white dots.......don't ask me why..........I don't know.  It seemed like a good idea at the time!

I painted their undersides too.


This has nothing to do with the little Christmas people, but it isn't nice to find dog hairs everywhere, especially in your drinks.........although; if you come to my house there will be dog hairs everywhere............


You see?  these are my two Border Collies who help in every area in the house including the craft room......... Jazz likes to play with items that can be altered such as sticks.....while Bess is more into zen crafting.........it all happens inside her head!

Right back to the topic then:

So, before we go any further, here are the hats in the process of being cut out of the felt.


So here we have two of the little people with noses (split red beads) and beards (from the wool).  They are now beginning to take shape and personality................


Here we see the hat being sewn.......I won't bore you with 6 photos so one will have to suffice!


This one is almost finished, and I put him next to a 50 pence to show you how dinky he is.........


Sometimes, little things are now as sweet as they seem....

Sorry! 


Here we have them all lined up waiting for their hats........isn't it exciting.........nearly finished.  Perhaps we ought to have a little tea party or something to celebrate.


Aren't they cute............and so tiny too.
All they need are the pompoms to finish off their hats.  I thought they just needed that something extra, so I found some red felt type berries in my Christmas stash and glued them to the tops of their hats.  


I hope you like my little people, because there are others that will be making an appearance ...coming soon

'Tis the season to be jolly.....actually it is always time to be jolly, even when you don't feel like it.


I hope you remember to pop by and visit my blog..and if you do and see that I haven't been around..send me a wee reminder .........thank you.

Much love and blessing to you all.

Annie xx

Friday 15 February 2013

Bookmarks

BOOKMARKS

I know they can be a bit of a non-event, but I have just completed an order for 18 bookmarks for a lady, who wanted scripture on them and ribbon too. So here they are:


Each bookmark is different, although the manner in which they were made is identical. I printed the scriptures onto card, using various fonts and for the first one I actually used an image I was given. Each die cut piece is layered.  However, If you look at them closely you will see that the scripture is layered onto a coloured backing and then the ribbon is between the coloured part and the last part.  (Does that make sense?) 


If it doesn't make sense...................


Meanwhile here are some more bookmarks:


And, of course, these have plain backgrounds.  I fixed the ribbons in between the top two and the bottom one.  At the end of the ribbons there are buttons, which I used tacky glue to stick together with the end of the ribbon in between.

Some more:

I used two ribbons on the fancy blue bookmark as I thought it would be different.........I like different......................I like different a lot:


Some more bookmarks:
 I thought the words were difficult to read so I did a close-up of the words.

So you see how different they all are?  I said I liked different......


There is not a lot to say about bookmarks, is there? Well, hopefully everyone who gets one of these will know that they are very special people:


I love the ribbon and buttons for these two..............they are 'just right' I think.

More bookmarks.......................


I love the colours yellow and green............in fact I love all colours, so when I go out I can look like I have just visited a paint factory that had exploded and left it's colour charts all over my clothes.


And the last of one this bunch:


Now, you may think that all bookmarks should be long and narrow..............well,

I can do them too:


So, a final word from my favourite animal:


There's nothing quite like a Border Collie showing off!


Have a lovely Friday and weekend.  remember, if you need a hug......I will send you one (((((just for you))))))

If you fancy a chat you will find me in various places................as well as right here!

Love and many blessings

Annie xxx

Thursday 14 February 2013

Flower tutorial

Flower Tutorial


Hello everyone.  I hope you are all fine and dandy.  I have been very busy doing crafty stuff.  Experimenting really.  So don't go expecting professional craftiness in this blog..........it does't exist.  What does exist is me, playing with paper, die cutters, glue and pens and stuff like that.

So to get you in the mood:


Right then....back to the job in hand!

I fancied making my own paper flowers and had a look around the internet.  So this is what I have come up with.

First of all you need:

Die cutting machine or large scalloped scissors
Dies
White good quality paper (I used 120 gsm)
double sided paper
permanent markers
Small plain brads
water to spray 

So here are pictures of my preparation:


The blue dies are for roses and the scalloped dies for flowers.  The blue dies are Marianne Dies and the brown ones are spellbinders.

I used my cuttlebug on this occasion but you should use whatever die cutting machine you have.  If you don't own a die cutting machine then using a scalloped scissors will achieve good results for the flowers, but I am not sure about the roses.


I cut strips of white copy paper (120 gsm) to cut out the flower die 8 times. When using the smaller die, I only cut out 6 flowers.

So this is what you end up with:


As you can see I used white paper for the large flower, and double-sided paper for the rest of the flowers.  This double sided paper is a new set from Craft creations, and I am very excited about it because it is really versatile.  You can have it spotty on one side and contrasting colour on the other side (as seen in the photo above). It also comes in a variety of colours.......not just pink!

We will start with the flowers and do the roses last.

So, we have the basis to start making flowers now.


Gather up the flowers in their size and use a pricking tool  (Kathleen..behave!) She knows exactly who she is and what I am talking about. I used the one in the photo above, and this is what it looks like:


The next thing that happens is quite fun.  


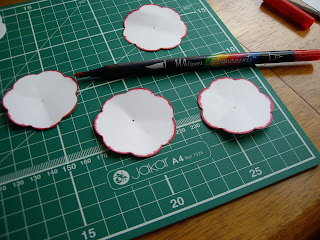
We now edge each flower with a colour of your choice............it has to be a permanent marker as the flower is going to get wet, You will see with the smaller one the effect of using a non-permanent pen.  I used a whispers permanent red pen on the large flower.


You don't have to be precise..........as long as the edges are coloured and contrast the paper.  If you look closely at the photographs you will see I was not careful and I was generous with the edging.

Something to think about as you get older:


Okay then...............................  Back to craftiness:


Here are all my flower heads edged.  The small flower heads were edged with a non permanent deep pink pen.

Time to get wet now:


In the picture you can see my little plastic spray bottle, which I filled with tap water.  Each flower-head is to be sprayed and made very damp...............and then


You just scrunch each one up as tight as you can............there's nothing more fun than colouring, wetting and scrunching bits of paper.  Almost immediately, while they are all still damp you now open each flower head up.


So now you have damp, creased roundish bits of paper.  I said this was fun to do didn't I?


We are now progressing very well, if I may say so!!!?


Okay, I know, the flowers haven't been scrunched or dampened in the photo above, but I just wanted to check that you were paying attention!!  If you look closely you will see I have put a brad with each set.  Just a tiny plain brad will do, because it is not going to be seen when the flower is finished.


It looks quite nice just like that, doesn't it?   Stick the brad through the centre of every same sized flower head, just like the picture above.  Turn it over and flatter the pointy bits (I told you not to expect anything professional here!)  You will see the pointy bits when you turn it over and you separate them bending them flat against the back of the flower.


Now it is time to start more scrunching......I know the photo is out of focus..........I took so many of them and none of them were right, so I have used the best of the worst of them!  You pull the first flower head up and squidge it al together as in the photo above.  Then you add the next flower head to it and do the same all the way until you have scrunched them all.


So now you see it is all completely scrunched up.  The magic happens shortly..................


Abra---ca---dabra........well, it's not magic really its just opening up the whole flower!


Here I am doing the same with the smaller flower heads: 


As you can see from the picture, the smaller on is a lot more pink than when it started out.  This is because I didn't use permanent ink and so the colour ran into the paper.  It doesn't spoil it, but you have to be careful if you don't want it to run into the paper, so that is why I suggest you use a permanent pen.

Here are the two flowers together:


They are both lovely, and when i have used them, I will show you the end product.


Now for a quick break!


Right then, it's time for the roses.


As you can see in the picture I use a tweezers and tacky glue!


The photographs are blurred, and I am really sorry about that.  I tried so many different ways and angles, and rooms.....so you get what I could do!!!!!

I took the outside edge of the cut rose die and curled it so that the dark colour was on the inside.


Once it is all curled you find there is a piece left that is almost a circle...........


You then take the rose off the tweezer (now, some people roll it up with their fingers, and others use a quilling tool......)  So you see there are lots of ways of ding this.  Allow the rose to uncurl in your fingers until you are happy with the size and width.  Press the centre so that the base is fairly even.  Turn it over and put copious amounts of glue in the bottom centre........


I know that people say to be careful with the amount of the glue used but I am really generous with it.  What happens next is this:

grasp the large bottom bit and wrap it around the flower, pressing quite firmly for a few seconds.  Tacky glue is great because it does not take long to become stuck to itself!!!


I hope that this tutorial has been clear enough for you.  The results of the flowers and roses are here:


I hope you have enjoyed your visit today.................I have loved putting this together, even thoughI am not a professional crafter. 

Enjoy playing with your flowers, getting wet and scrunching.


and finally:


See you again very soon.

Love and blessings

Annie xxx